Showing posts with label Hair Technical Folder. Show all posts

Saturday, 19 March 2016

Practical-Creating Gothic Inspired Hairstyles


During the hair session when Helen was away we were told to re-create this gothic looking hairstyle that is quite a trendy look at the moment. This hairstyle consisted of messy middle parting and two buns on either sides. After parting the hair, I tied the hair into two pony tails on both sides and kept them quite high on top of the head. I then curled small sections of hair in the pony tails and back combed this hair. This would give the hair more volume and make the buns at the top of the head appear larger. This could be a great technique to use specially if the model has thin or less hair. Next I styled the pony tails into buns and pined them in place. As this was a messy look I slightly tagged on the buns to make them a little more loose.

Wednesday, 16 March 2016

Practical-Victorian Hairstyle Inspired from American Horror Story


This was a hairstyle that we created in the hair sessions inspired from American Horror Story, the image that is at the top of the page. In the show this was inspired from the late Victorian era and is a more contemporary style than the typical victorian hairstyles.

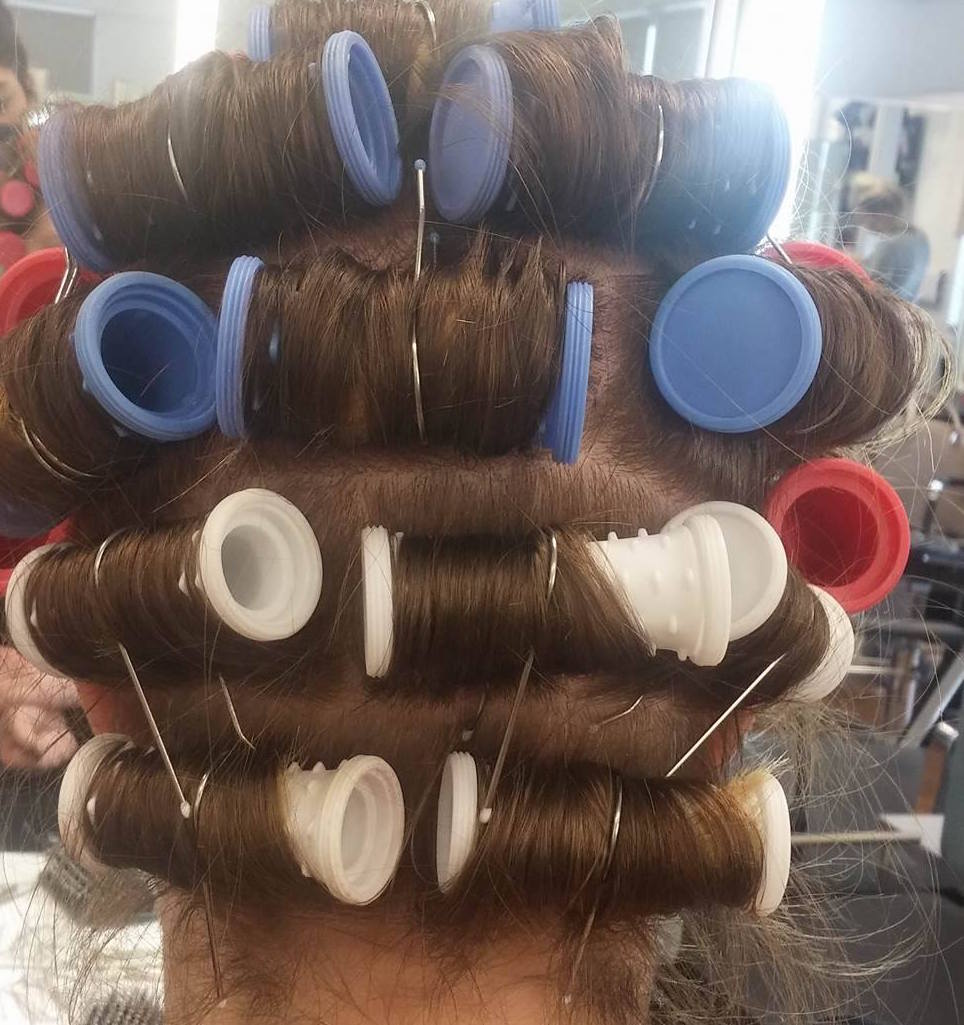
  • To re create this hairstyle I used hot rollers to se the hair in curls to get the way effect the original image of the hair has.
  • The rollers were put into the hair using  brick layout. This would prevent any harsh edges and hair partings at the back of the head as we want a smooth finish at the back. 
  • After the hair has cooled down, take the rollers out.
  • With the hair at the back of the head, roll up the curl to the head and pin it in place. This will almost look like a horizontal french roll.
  • Withe the hair at the front sides of the face, with the curl already formed in the hair create a structure and pin it in place. 
Looking at the finished outcome of my recreation, I was not really impressed with the finished results as I thought it could have been better. The hairstyle was quite messy and the structures i created on the sides of the head were not even on both sides. I need to practice with my hair skills quite a lot to perfect them making sure I can work with hair for the future. 

Thursday, 10 March 2016

Reflection and Evaluation On Part 1 & Part 2 Continuity Assessments


                        Part 1                                         Part 2 


                     Part 1                                           Part 2 


                      Part 1                                           Part 2


                     Part 1                                                Part 2


I personally found the continuity assessments really challenging and struggled with continuity part. It was extremely difficult creating the same character that had to be perfectly the same as the first one. In my opinion, the details that ruined the whole look were the veins and the hair in the second part of the assessment. They were the biggest downfall of the recreation of my character. The hair loops that went over the ears were slightly higher in the second part than the first part of the assessment.

The veins under the eyes are not as dark as they were in the first part of creating Lucy. I also noticed that the colours in the second part were different to the colours in the first part. This could be due to the difference of the flash power as all my camera settings were the same as I used in the fist part. The flash must have been too bright for the second part as the purple under the eyes appeared more brown than purple. I also think this could be due to the difference of position of my model under the flash.

I also thought on the second part of the assessment the colours looked different in person than on camera. It is my stupidity that I did not write the flash power down and this turned the colours into a disaster. I wasn't pleased with the outcome of the second part of the assessment and I feel I could have done much better specially with the continuity errors of the veins, hair and flash power. I will keep this in mind for any future continuity I have to create.

Final Continuity Assessment- Part 2


Continuity Notes for Part 2 of The Assessment

Continuity Notes
  • After setting up wash hands and carrying out health and safety,
  • Mix the Illamasqua skin base and the lightest foundation colour to get the pale complexion of the base.
  • Remember to mix equal parts like done in the first part to get the same shade of the colour. 
  • Apply this to the face, ears neck and all the visible parts of the skin.
  • Apply it on the back of the neck, ears and chest at the end.
  • On the eyes first use the yellow as the base, then start applying the purple and brown.
  • Start applying them lightly and build the colours more stronger if needed.
  • Make sure to apply the colours darker in the inner corners an the outer corners of the eyes.
  • Blend it to make sure it looks natural and draw the two lines at the bottom of the eye and blend like in the first part of the assessment.
  • Use the natural neutral colour from the mac palette in the middle of the top eye lids.
  • Using the black Illamasqua eye shadow contour the cheeks, forehead and the jaw line.
  • Make sure this is blended well so that it looks natural.
  • Then switch to the hair after this.
  • Create the middle parting, making sure its straight and create a parting separating the hair at the back and the front.
  • Tie the hair at the back into a ponytail make sure to look at he pictures from the first assessment as need to make sure the bun is in the same place. 
  • Braid the ponytail into two braids, fan them out and pin it in place. 
  • Loop the the hair on either side of the parting and take it over the ears.
  • Pin the loops over the bun and make sure the hair at the front is smooth.
  • Curl the loose hairs at the back of the neck using tongs and make sure the curl is in the same direction as in the first part.
  • Then draw the veins and reference this to the pictures from the first assessment. 
  • Dab them with fingers to make sure they look natural.
  • Start with the left eye, the side that doesn't have the nose piercing.
  • Put on the fangs making sure they stay in place and are secure.
  • Dab blood on the lips and teeth and look at the pictures from the first assessment.
  • Go over the back of the neck chest with the base colour and tie the lace in place. 
  • Re apply the blood and teeth at the end if needed. 

Final Continuity Assessment- Part 1


Lucy- 3rd Hair Practice on Model


This was my 3rd attempt at practicing the final design of my hair. I was pleased with the shape and structure of the bun as I used the technique I discovered in the second practice I did. The bun looks more round and has a good shape to it. I was also pleased with how the loops came out as this time they both went over the bun rather than one of them just going half way through. I just have to make sure they are neat and at the same level on both sides and are equal at the back as well.
I also need to make sure that I keep the loops overlapping neat over the bun as seen in the image ave it looks pretty messy. Looking at the overall hairstyle, keeping the loops at exactly the same level will be challenge for continuity.

Lucy- 2nd Hair Practice on Model


For the 2nd practice I tried creating the late victorian style from the front while still keeping the bun at the back. I honestly was not happy with how it came out and decided to stick to my original design. I used the heated rollers to create the two vertical and two horizontal structure on either side of the middle parting. I then created the braided bun at the back of the head. I was pleased with the shape of the bun and realised the mistake I did during the 1st practice. During the first attempt the braids were too tight and I directed them in different directions hence I got the funny shape.

During this trial I fanned the braid out before tying it in place and I thought this gave the bun a more fuller and bigger look. I also directed both the braids in the same direction and pined them in place. I was happy with the overall shape of the bun and would use the same technique further. On the other hand the front was a complete disaster apart from the sides that were pulled back flat and tied around the bun. The top section was just not the way it was meant to look like. The middle parting is barely visible and the hair at the top is meant to have height, shape and structure where as this looks flat. I was not pleased with the overall look and will stick to the original design as this was just a trial to see what look would look better with the make-up.

Lucy- 1st Hair Practice on Model


This was my first attempt at practicing my final hair design on my model. As seen from the pictures I clearly need more practice. Looking at the middle parting it is not straight at all. It has to be as straight as possible as it was like that during the nineteenth century. I also have to make sure that all the sectioning I do has equal parts of hair in order for the loops to be equal. Looking at the loops they look neat however they do not look equal in texture and the part where the loop drops.
My model's hair is short and as seen in the picture it does not go over the bun. I need to sort this out as it will not be the right thing to do in the final assessment. I was not happy with the bun as it hasn't formed the round shape but looks like two braids folding into each other. Overall I was not pleased with how this trail came out and I need to practice the design more to get it right for the final continuity assessment. 

Tuesday, 8 March 2016

Lucy- Final Hair Design


This is my design for y character, Lucy. I chose this typical Victorian hairstyle because I thought that it would fit in best with my character that I am creating. I would have the middle parting as it represents hair of the nineteenth century. I would have the sides that form loops and go over the bun at the back. The bun at the back will be a braided ponytail that is created into a bun. I picked this particular hair design for Lucy as she died on her wedding dress she would have her hair styled for that day. I have to be very careful with this hairstyle as I will have to make sure that the loops are equal on both sides and should also be the same for the continuity assessment. The bun and the middle parting should also be in the same positions. I feel that this will be a little tricky specially for continuity. I will have to practice more and more to make sure this comes out right.

Sunday, 28 February 2016

Practical-Late Victorian Hairstyles


Health and Safety:
  •  Make sure there are no trailing wires which could cause a hazard. 
  • Keep bags and objects under the working area.
  • Make sure all electrical equipment has been switched off after being used and stored away safely.
  • Always check the rollers temperature as if too hot could burn the scalp.

Creating Late Victorian Hairstyles
  • During the late nineteenth century the length of the curls started getting longer and the hair had more volume and hair ups were introduced. 
  • Using heated rollers place two rollers vertically on either side of the middle parting.
  • Place another two horizontally within the same parting, as shown in the image below.
  • The rest of the hair can be curled using rollers or curling tongs.
  • I used rollers as i wanted to see whether it gives the hair more volume than curling tongs.
  • The hair at the back can be styled at the back leaving some curls loose as this was a trend in the nineteenth century. 
  • The hair on the side if the head that is on the two vertical rollers has to put back sleek and flat.
  • The hair on the tongs at the top of the head has to be twisted and put back giving the hair height in the middle.


Practical-Early Victorian Hairstyles

Health and Safety:
  •  Make sure there are no trailing wires which could cause a hazard. 
  • Keep bags and objects under the working area.
  • Make sure all electrical equipment has been switched off after being used and stored away safely.
  • Make sure all appropriate PPE is worn.
Creating Early Victorian Hairstyles

  • Create a middle parting from the front going back halfway through the head.
  • Part each section downwards reaching the back of the ears.
  • As in the early years they used to have curls just going half way down the face.
  • To create these use a pair of tongs.
  • Section each side into equal parts and curl the hair inwards using the tongs.
  • This will give the hair the curves at the top.
  • To create the braid on the side of the face, start braiding the hair from the ear into a loose braid.
  • Then tuck the braid into the braided bun at the back of the head. 
  • The braid should go below the ears, as worn in the Victorian Era. 
  • Another style was the twist on either side of the head going into the bun.
  • Twist the hair from the point of the ear and twist backwards.
  • Take the twist over the bun and tie it in place using bobby pins.