
Showing posts with label Make-Up Technical Folder. Show all posts
Showing posts with label Make-Up Technical Folder. Show all posts
Thursday, 14 April 2016

Friday, 18 March 2016
Practical-Creating Light Scars Using Moulds


Health&Safety
- Carry out a consultation to make sure the model has no contra-indications and is not allergic to ant products.
- Make sure all products are displayed appropriately on the working area.
- Make sure model's hair is tied up and is covered with a cape.
- Wash hands before and after.
List of Products and Tools
- Cleanser, Toner, Moisturiser
- Cotton pads, Cotton buds, Couch Roll
- Supra Colours
- Appropriate Brushes
- Spatula's
- Moulds made from Gelatine
- Stipple sponge
- Fake Blood
- Pros Aide glue
- Witch Hazel
- Pro Clean Remover
How to Create Scars Using Moulds
- Apply the pros aide glue to the area that the mould is going to be placed on.
- The glue also has to be applied to the back of the mould, this is called contact glue and helps the mould adhere better to the skin.
- Make sure the glue goes clear before applying the mould to the skin and press really hard to make sure the mould is securely stuck to the skin.
- After the mould is applied, using witch hazel go across the edges of the scar to blend the edges as it has to look natural and not stuck on.
- After the edges are blended in powder over the top of the mould as this will stop it sticking to each other.
- Then go in with the colouring and fake blood can also be used.
Evaluation
I liked the finished result of using the mould as it looks like an actual scar and the fact that it is not like wax where sometimes when colouring in it starts to come off its place. The part I found most challenging was melting down the edges using witch hazel. This is the hardest part of creating the scar as I had to make sure it looked natural.
Thursday, 10 March 2016
Reflection and Evaluation On Part 1 & Part 2 Continuity Assessments
Part 1 Part 2


Part 1 Part 2


Part 1 Part 2


Part 1 Part 2


I personally found the continuity assessments really challenging and struggled with continuity part. It was extremely difficult creating the same character that had to be perfectly the same as the first one. In my opinion, the details that ruined the whole look were the veins and the hair in the second part of the assessment. They were the biggest downfall of the recreation of my character. The hair loops that went over the ears were slightly higher in the second part than the first part of the assessment.
The veins under the eyes are not as dark as they were in the first part of creating Lucy. I also noticed that the colours in the second part were different to the colours in the first part. This could be due to the difference of the flash power as all my camera settings were the same as I used in the fist part. The flash must have been too bright for the second part as the purple under the eyes appeared more brown than purple. I also think this could be due to the difference of position of my model under the flash.
I also thought on the second part of the assessment the colours looked different in person than on camera. It is my stupidity that I did not write the flash power down and this turned the colours into a disaster. I wasn't pleased with the outcome of the second part of the assessment and I feel I could have done much better specially with the continuity errors of the veins, hair and flash power. I will keep this in mind for any future continuity I have to create.


Continuity Notes for Part 2 of The Assessment
Continuity Notes
- After setting up wash hands and carrying out health and safety,
- Mix the Illamasqua skin base and the lightest foundation colour to get the pale complexion of the base.
- Remember to mix equal parts like done in the first part to get the same shade of the colour.
- Apply this to the face, ears neck and all the visible parts of the skin.
- Apply it on the back of the neck, ears and chest at the end.
- On the eyes first use the yellow as the base, then start applying the purple and brown.
- Start applying them lightly and build the colours more stronger if needed.
- Make sure to apply the colours darker in the inner corners an the outer corners of the eyes.
- Blend it to make sure it looks natural and draw the two lines at the bottom of the eye and blend like in the first part of the assessment.
- Use the natural neutral colour from the mac palette in the middle of the top eye lids.
- Using the black Illamasqua eye shadow contour the cheeks, forehead and the jaw line.
- Make sure this is blended well so that it looks natural.
- Then switch to the hair after this.
- Create the middle parting, making sure its straight and create a parting separating the hair at the back and the front.
- Tie the hair at the back into a ponytail make sure to look at he pictures from the first assessment as need to make sure the bun is in the same place.
- Braid the ponytail into two braids, fan them out and pin it in place.
- Loop the the hair on either side of the parting and take it over the ears.
- Pin the loops over the bun and make sure the hair at the front is smooth.
- Curl the loose hairs at the back of the neck using tongs and make sure the curl is in the same direction as in the first part.
- Then draw the veins and reference this to the pictures from the first assessment.
- Dab them with fingers to make sure they look natural.
- Start with the left eye, the side that doesn't have the nose piercing.
- Put on the fangs making sure they stay in place and are secure.
- Dab blood on the lips and teeth and look at the pictures from the first assessment.
- Go over the back of the neck chest with the base colour and tie the lace in place.
- Re apply the blood and teeth at the end if needed.


Tuesday, 8 March 2016
Lucy-Final Face Design

For the eyes I will use yellow, dark purple and brown shadow colours to create the effect of shadows under and over the eyes. I need to make sure I keep it as light as possible so that it doesn't look over dramatic towards the theatrical side of things. I came up with the idea of having little broken veins under the eyes. This could be because of the fact that she is dead or the fact that she has been ill. I also have to make sure that they should look like they are sitting under the skin and not on the skin. I have to make sure they look as natural as possible and not just lines overdrawn on the skin. For the lips I will use a dab of red lipstick or I thought of using a dab of blood as it would be more appropriate after she dies as she lived off the blood of others.
Lucy-FaceChart Designs


I created the above face chart based on the dark and Gothic colours to create a very theatrical looking vampire. I used the white supra colour as the base on the whole face. I then went ahead and added shadows to the face to give the face a very sunken on appearance that the un-dead usually have. I did this using the black illamasqua eye shadow. I used a black gel liner to line the top and bottom of the eyes as well as the waterline. This would make the eyes stand out being even more bold. Lastly I used a red lipstick on the lips and to finish the look I wore some fangs and contacts that would scare the life out of anyone. Looking at the final outcome of this look, I thought that it looks very contemporary and is not a Victorian look at all.
The pale complexion seems way to white and this makes the look very bold. Also the shadows around the face in my opinion look way too dark and the bold strong black colour all over the face including the eyes makes it very theatrical and this is something I do not want to do for my final assessment. The lips also look very modern as they have a perfect structure, shape and texture. I now need to tone down the white to get a pale complexion, I also need to lighten the shadows on the face almost making them invisible yet still have the shading. I need to lighten the colours around the eyes and also rectify the lips. I could have a natural colour on the lips or if I do want to use red it could be dabs of it. In conclusion, looking at the image it does look very contemporary and theatrical.

Learning from the first face chart, I will keep the base for this design pale and not completely white. I will either buff out the illamasqua skin base or mix in a very light colour of foundation to get that very pale complexion. With the shading on the face instead of using black I would use natural skin colour contours to see what effect it will give.
For the eyes I would try using dark purples and browns to get the sallow appearance of an un-dead creature. They will look like shadows under the eyes, almost as if someone hasn't slept for a long time, being ill or emotional. On the lips I would want to experiment with red lips with black in the corners of the lips. This is a Gothic look, however this might look modern instead of period.


I kept this face chart fairly natural as I wanted to experiment just keeping the looks of the natural beauty from the Victorian era. I would have a pale base for this look, for which I would use the lightest foundation in the palette. I will use a slight blush on the cheeks, using a very light pink blush just to make the cheeks look radiant. I will also keep the eyes fairly natural and I will use neutral colours like beige or skin colour shadows over the eye lids. This will brighten up the eyes and make them pop. I will use red lipstick on the lips, although they had natural lips in the period I just want to see how the design will look and come together as a whole.
To create this look I used my skin matching foundation colour and powdered it using translucent powder. I went in with a very natural shadow on the eyes and lined my waterline with brown kohl pencil as this would keep the eyes natural. On the cheeks I applied a slight blush just to make the skin look healthy yet keeping it natural. I kept the lips natural and applied the tiniest bit of clear gloss. Even though on the face chart the lips are red I kept the lips natural as I really wanted to try and create a very natural Victorian look.
To create this look I used my skin matching foundation colour and powdered it using translucent powder. I went in with a very natural shadow on the eyes and lined my waterline with brown kohl pencil as this would keep the eyes natural. On the cheeks I applied a slight blush just to make the skin look healthy yet keeping it natural. I kept the lips natural and applied the tiniest bit of clear gloss. Even though on the face chart the lips are red I kept the lips natural as I really wanted to try and create a very natural Victorian look.
Sunday, 28 February 2016
Practical- Dirt, Dirty Teeth
- Carry out a consultation to make sure the model has no contra-indications and is not allergic to ant products.
- Make sure all products are displayed appropriately on the working area.
- Make sure model's hair is tied up and is covered with a cape.
- Wash hands before and after.
- Make sure to consult with the model whether they have had their teeth whitened before using the teeth enamel.
- Also make sure to tell the model that the spirit remover should not be swallowed.
List of Products and Tools
- Moisturizer
- Cotton pads, Cotton buds, Couch Roll
- Spirit(remover)
- Fullers Earth
- Hair Drier
- Spatula's
- Colored Krayolin Spay's
- Supra color/Aqua color
- Kryolan tooth enamel
- Spirit Remover
Dirty Teeth
- Firstly wipe the teeth that the enamel is to on, as this will get rid of any moisture on the teeth and help the enamel adhere better.
- Shake the bottle of the tooth enamel to make sure all the particles are mixed.
- Pour the chosen enamel on a palette and close the bottle as it dries up quickly.
- Using a baby bud apply the enamel on the desired teeth.
- Let this dry for a few seconds and tap it till its dry before the model closes her mouth.
- To remove the enamel, dip a baby bud in spirit and remove the enamel.
- Make sure to dab any excess spirit off the baby bud as it should not be swallowed by the model.


- Make sure the model's clothing is protected.
- Moisturise the hand that is to be dirtied.
- Mix the fullers earth powder with water until it forms a paste.
- Using a brush or your hands apply the paste onto the model's hand.
- Dry this using a warm hair drier, always checking that the heat does not get too hot and burn the model.
- Once the paste is dry it will turn into a lighter more of an off white colour, as seen in the middle picture below.
- Once dried it can be coloured it using krayolan coloured hairsprays, aqua colours or supra colours.
- I used the dirt grey krayolan spay as seen on the picture on the right hand side.

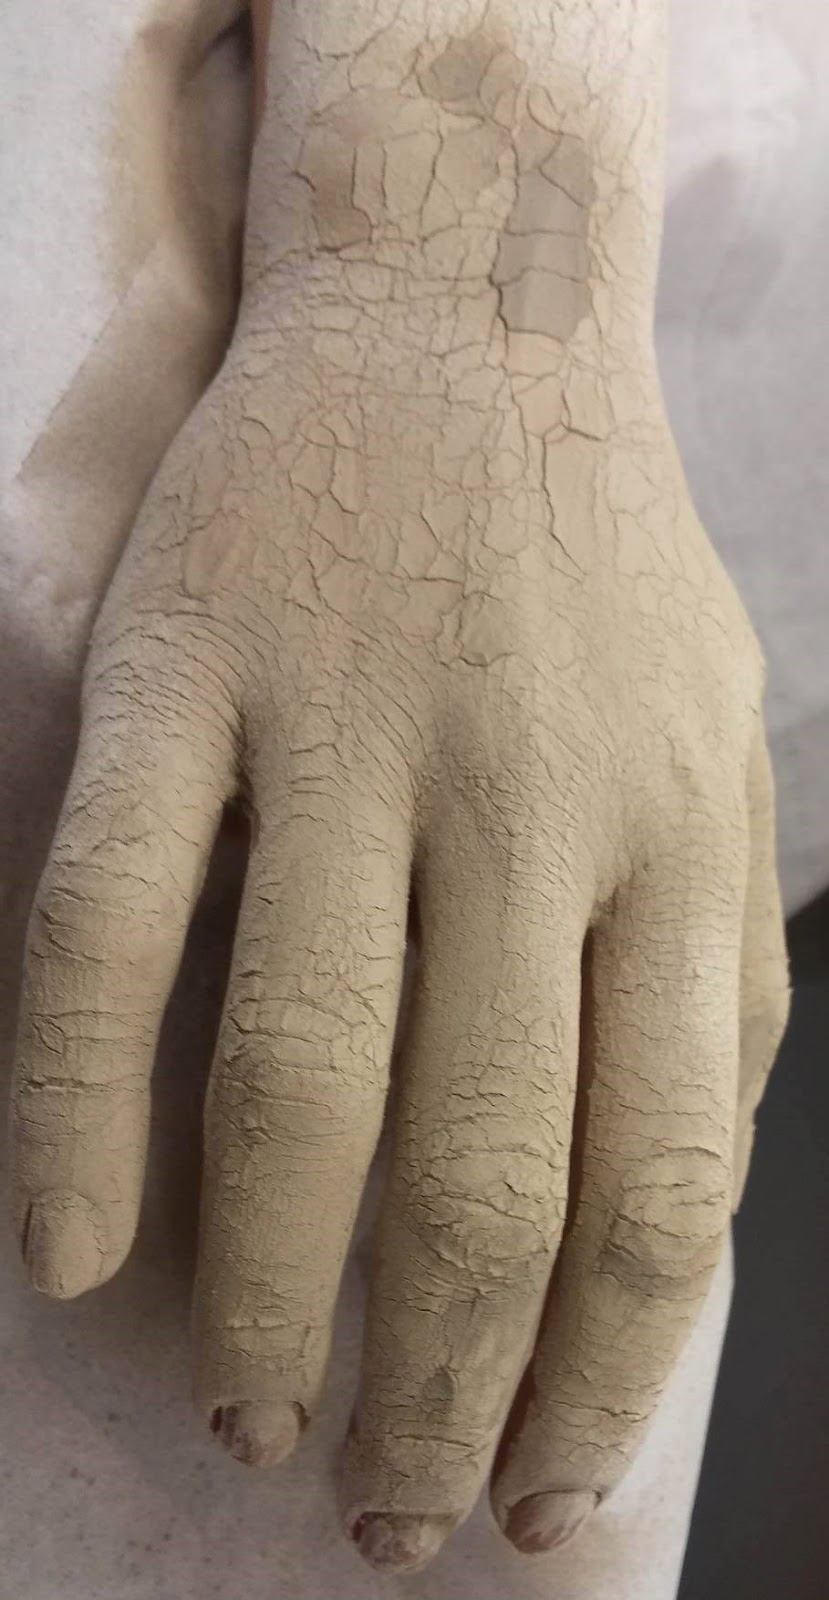

Evaluation
I found dirtying down the teeth a little difficult as I thought what I did, didn't look natural at all and it just looked like I have painted the teeth. I need to practice that a little more to perfect it so that it looks more natural and more like decayed teeth. I enjoyed learning these new skills and quite liked dirtying the hands. I found it interesting as I could use this not as dirtying but to create a character.
Practical- Sweat, Pallor and Tears


- Carry out a consultation to make sure the model has no contra-indications and is not allergic to ant products.
- Carry out a test patch before using latex on the model.
- Make sure all products are displayed appropriately on the working area.
- Make sure model's hair is tied up and is covered with a cape.
- Wash hands before and after.
List of Products and Tools
- Cleanser,Toner, Moisturiser
- Cotton pads, Cotton buds, Couch Roll
- Supra Color
- Brushes
- Duo Lash Glue
- Translucent Powder, Powder Puff
- Latex
- Glycerin
- Alcohol
- Spatula's
- Disposable tear drops.
Fever/Pallor
- Pallor is another word complexion that was used in the Victorian era.
- To create fever or a dull looking complexion on the skin use different shades red supra colour.
- This can thinned down using moisturiser or alcohol.
- This is thinned because you want just a tint of the colour as it should look as natural possible.
- The places that this colour would go on are the natural places one would red when ill.
- This features are the nostrils, the eyes, and the cheeks slightly going towards the chin.
- Always blend the colour away using finger tips as this gives a more soft and natural finish.
Dry/Cracked Lips
- To create a cracked or dry lips effect duo lash glue or latex can be used.
- Simply dry the lips to get rid of any natural moist on the lips.
- Get your model to pout lips, squeeze a little glue onto fingers and dab it on the lips.
- Once this is dry powder over the glue to get the dry cracked effect.
- You could even use a little blood in between the cracks.
- If you were to use dripping blood a pipette would be easier to use.
Sweat
- To create sweat glycerine is used.
- Put some glycerine at the back of your hand.
- Using a stipple sponge, apply this to the areas on the face that would sweat naturally.
- These are the forehead and nose. Some people also sweat on the upper lip.
- Water spays could also be used on baby hairs to make it look like the person is really sweaty.
- The back of the neck also gets sweaty and is also an area to consider.
Tears
- Individual eye drops are used to create tears.
- Tears are always formed in the inner corners of the eyes and not outer.
- Put the drops in the inner corners of the eyes and this will water the eye hence giving the eye a teary effect.
- If using glycerine, apply it under the eye being careful that it does not go into the models eyes.
Evaluation
I really found creating the fever complexion challenging as I had to make sure I made it as natural as possible. The tricky bit was getting the colour right and also placing the redness in the right areas on the face. Looking at the picture on the top left hand side, I only created this effect on the left of my model's face. I did this to see the difference and wether it looks like she is ill or not. She does look like she has a pale complexion, however I feel that I need to practice this a little more.
Practical-Burns


Health & Safety
- Carry out a consultation to make sure the model has no contra-indications and is not allergic to ant products.
- Make sure all products are displayed appropriately on the working area.
- Make sure model's hair is tied up and is covered with a cape.
- Wash hands before and after.
- Make sure to test the gelatine is not too hot before using.
- Make sure that the model to be used on is not vegan.
List of Products and Tools
- Cleanser,Toner, Moisturiser
- Cotton pads, Cotton buds, Couch Roll
- Supra Colours
- Appropriate Brushes
- Colloidal
- Spatula's
- Gelatine
How to Create Burns Using Gelatine
- Gelatine comes in nugget forms and is usually better to use in this form as you will know exactly how much you need and wouldn't be wasted.
- Always heat the gelatine in a plastic bowl and not metal. After heated always test a tiny bit to make sure that it is not too hot as this can burn the skin.
- While the gelatine is still hot, not burning hot press it on the the skin until it goes tacky.
- Always make sure to cover a large area as this will make it look a little more natural. This also depends on the type of burn that is being created and whether it is a first, second or a third degree burn.
- After the gelatine has dried which it does quite quickly, go in with the colouring. When creating a gelatine burn avoid powdering it as burns are usually quite shiny.
- Burns can be coloured by scrapping aqua colours on them however, supra colours are the best medium to colour in burns.
- When creating a burn always make keep in mind how old the burn is, whether it is an old burn or a fresh burn. Also keep in mind what kind of burn it is for example, chemical burns are different to water burns.
Evaluation
Creating burns was the most challenging effect to create. I struggled with forming the right colours of the burns. I also could no create the right shape of the burn as seen in the third picture at the bottom of the top two. I think I need to practice working with gelatine more and also practice how to colour them in.
Practical- Cuts, Bruises and Black Eye
Health&Safety
- Carry out a consultation to make sure the model has no contra-indications and is not allergic to ant products.
- Make sure all products are displayed appropriately on the working area.
- Make sure model's hair is tied up and is covered with a cape.
- Wash hands before and after.
List of Products and Tools
- Cleanser,Toner, Moisturiser
- Cotton pads, Cotton buds, Couch Roll
- Supra Colours
- Appropriate Brushes
- Disposable Brushes for Latex
- Plastic Palette
- Spatula's
- Round edged metal spatula
- Cine Wax
- Stipple sponge
- Acetone
- Sealer
Black Eyes
- When creating a black eye always make sure you have a reference image of a real black eye that you are working from.
- Get the model to close her eyes and apply some moisturiser on and around the eyes.
- This will make the colours put on more bendable.
- Always make sure the darker heavier colours are in the corners of the eyes and are blended out.
- Also the colours should go as far as the lash line.
- The colours mostly used to create black eyes are dark purples, blues, yellows and some shades of blues.
- Apply the colours lightly and build up the colours gradually.


Cuts & Bruises
- Wax is used to create cuts.
- Warm up the wax on the back of the hand.
- Apply some spirit gum on the area of the cut and tap it until it goes tacky.
- Put the wax on top of the tacky spirit gum and smooth it down using the palette knife and fingers.
- To avoid your fingers from sticking to the wax apply some moisturiser or vaseline onto your fingers or palette knife.
- Make sure there are no harsh edges and it is all smoothed out and that it is not spread out too far on the skin.
- Make the cut in the middle and cover the surrounding wax with latex or sealer if someone is allergic to latex, apart from the middle of the cut.
- Make sure the edges of the wax is covered with latex as well as this will keep the cut in place.
- If there are any harsh edges from the latex this can be removed or blended using acetone.
- Apart from the cut itself the rest of the wax has to matching the colour of the skin in that area.
- Always stipple the colour instead of painting as this gives a more natural effect.
- Supra colours can be diluted using IPA(brush cleaner).
- The base of the cut has to be dark, black or a bruise purple could be used for this.
- Wound fillers are also used for cuts, use a hair pin to fill the cut using this.
- To create bruises the bruise wheel from krayolan could be used and simply stipple the colours using a stipple sponge.
- In the images below I created cuts, broken fingers and bruises


Evaluation
I enjoyed creating cuts and bruises as I found it really interesting as you can create so many different effects using the same products and techniques. The little struggle I had was matching the wax base skin colour to the model's skin colour. I have to work on this and have more practice. With the black eyes the one I created doesn't really look like a black eye. I have to work on this mostly getting the colours right and make sure they are all blended together giving off a more realistic look.
Monday, 1 February 2016
Practical- Ageing
- Carry out a consultation to make sure the model has no contra-indications and is not allergic to ant products.
- Make sure all products are displayed appropriately on the working area.
- Make sure model's hair is tied up and is covered with a cape.
- Wash hands before and after.
- Make sure the model has had a test patch for latex.
List of Products and Tools
- Cleanser,Toner, Moisturiser
- Couch Roll
- Concealers, Foundations
- Translucent Powder, Powder Puff
- Beauty Brushes
- Disposable Brushes for Latex
- Stipple sponge
- Acetone
- Liquid Latex
- Barrier creams
- Plastic palette
- Hair drier
Ageing
- Pour a little latex into a bowl.
- When ageing the face always make sure the model has their eyes closed and barrier cream is applied on the area to be aged.
- Stretch the skin and using a stipple sponge stipple latex on the outer edges and corners of the eyes.
- It is best to stipple the latex as this gives no harsh edges.
- Dry it using a hair drier on a cold setting, still stretching the skin.
- Once latex is dry it goes clear.
- Latex can be layered on top of each other, providing each layer has dried completely.
- If there are any harsh edges these can be melted using acetone.
- Then using concealers or foundations match the skin colour of the model.
- When ageing hands it is the same process.
- Apply the barrier cream, stretch the skin and stipple on latex using a stipple sponge and dry with a hair drier.


Evaluation
I enjoyed the whole ageing process and how different parts of the skin can be aged. The only challenge I had was matching the colour on the latex to the model's skin colour on the face. this is because I found that the colour appears to be a different shade when applied on the latex to when applied directly to the skin. I need more practice with this to get it right next time as seen in the pictures above the foundation on the latex next to the models eyes does not match her actual skin colour.
Subscribe to:
Posts (Atom)